COTA Superbike Camp Riders Guide
The purpose of this document is to quickly cover the basic details and information you need to know when riding on a race track. This will enable us to save you time the day of the event!
This document will cover the following:
- Planning your day and setting goals
- The RACER Methodology
- Entering and Exiting the Track
- Flags
- Run Offs
- Fall Downs
- Lines and Passing
1. Planning Your Day and Setting Goals
When you signed up for the event, you set goals for the day. If your objectives change, that’s perfectly fine. Your assigned mentors will have your information before you arrive and will be personally selected to help you achieve those goals.
If possible, your mentors may text you before the event to begin coordinating. If you can arrange a shared pit with your mentors, even better! At Circuit of the Americas, mentors and riders share the garage, making the experience even more personalized.
Focusing on your goals will accelerate your overall improvement as a rider.
3:16 Trackdays has worked hard to recruit the best mentors. These riders don’t just participate in trackdays—they’re active members of local tracks and CMRA, training and riding regularly. In short, they ride more often than you do, not just when you do.
2. The RACER Methodology
In collaboration with professional racers, ex-pros, club-level experts, novice racers, and Texas’s most experienced coaching staff, we’ve developed the RACER method to maximize your Superbike Camp experience.
R A C E R
R – Relax – The first priority is to help every rider relax. Whether you’re a beginner curious about the day ahead or a seasoned rider aiming for a personal best, tension will hold you back.
- Stiff arms while riding
- Sore hands after sessions
- Out of breath at a moderate pace
- Rigid posture
- Not looking ahead
- Frustrated or tense mood
A – Achieve Basics – Regardless of experience, everyone must master the fundamentals:
- Entering and exiting the track
- Understanding the track layout
- Adhering to trackday etiquette (see the Golden Rules)
- Basic line theory: off-track discussion of line selection and development
- Experienced riders: dial in your line first thing in the morning
C – Chase Goals – 3:16 Trackdays offers personalized training. During sign-up, you identify two areas to work on, and your mentors receive this information in advance to create a tailored plan.
At a typical track day, you turn laps and hope to improve. At a Superbike Camp, we design your training around your specific objectives to ensure targeted progress.
Note: If your goal is simply “Have fun and ride at my own pace,” that’s perfectly acceptable. Your mentor remains available if you decide to change focus.
E – Evaluate – Assessment is key. During intake, we record your goals, experience, and pace to group you with riders of similar skill levels.
R – Respectful Feedback – Constructive feedback is essential but can be sensitive. We deliver insights respectfully to help you refine your skills without discouragement.
3. Entering and Exiting the Track
The most dangerous part of the day is entering and exiting the track. There will be a mandatory focus on this during the first session.
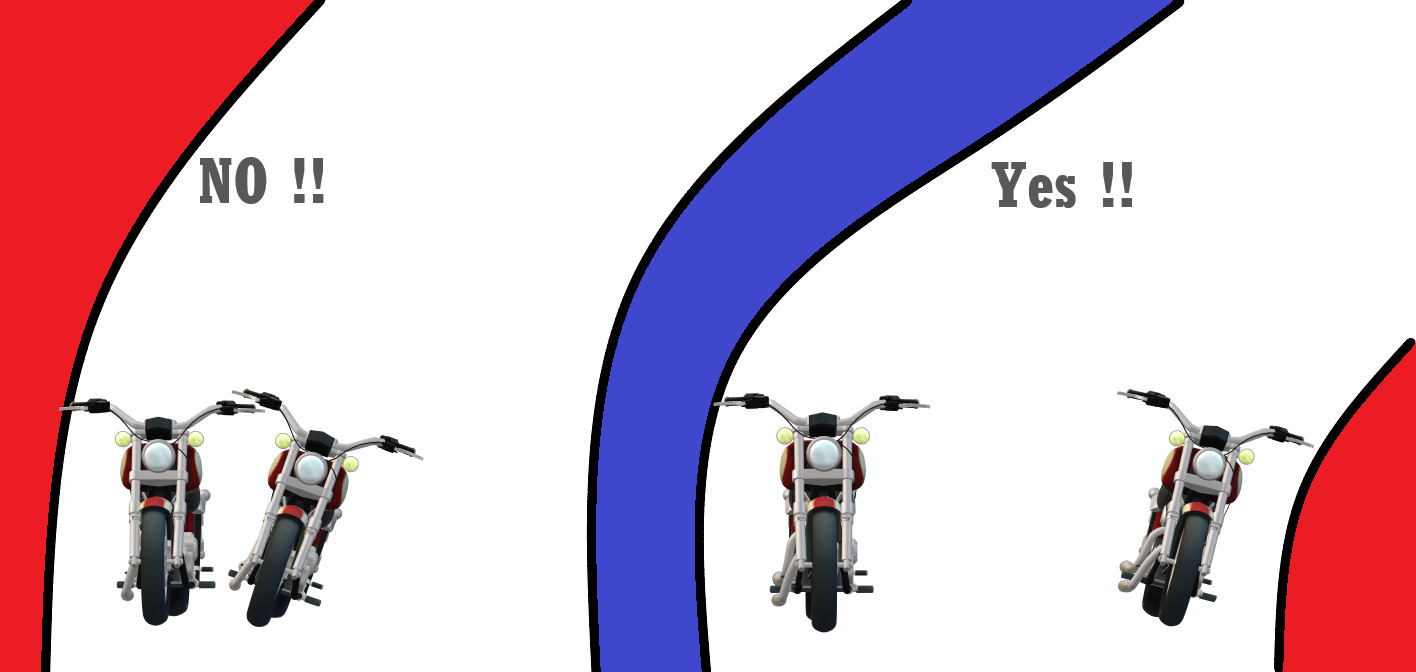
Entering the Track: When you enter the track, use a hand signal as you are getting on. The blue line shows the possible path of riders who are already on the track. The photo below shows how to enter COTA.
Green Line: Take the green line to enter COTA, stay to the left of the WHITE Blend Line.
Do Not Cross the Blend Line: This will result in a Black Flag.
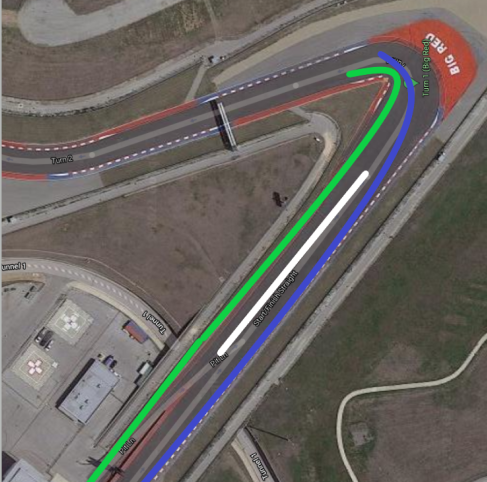
Exiting the Track: Turn 18 is where you will signal to exit the track. Repeat the hand signal “like a blinker”. Stay to the left of the track once you begin to signal and hug Turn 19 and stay to the left to exit the track.
- DO NOT change your mind once you signal to exit
- DO NOT suddenly pit once you cross turn 19. Do another lap to be safe
- NEVER exit the track suddenly - this is a high speed section!
- Tip: There is a Bridge before turn 18, use that as your reminder!

4. Flags
The basic flags are as follows:
- Green – My Favorite Flag, it means the track is open and you can get on (using proper signaling) and get to riding.
- Yellow (Standing) – Yellow Standing Means take caution, look up the track and pay attention. Do not pass during a standing yellow flag. Locate the Flags.
- Yellow (Waving) – Yellow Waving means something has happened, you need to use caution, if you see a rider off to the side don’t stop and don’t focus on them. Continue on with caution. Do not pass during a waving yellow flag.
- Black – This flag usually is pointed at a rider who needs to come off the track. There are many reasons, it could be safety related. Please exit the track if it is pointed at you and report to the track marshall.
- Black & Yellow – Crossed Black and Yellow means something has occurred and we need to clear the track. Please exit immediately, do not pass others, do not go super slow if you don’t need to. Continue looking up the track for the incident to make sure nobody is on the track. This is used for events like debris on the track or a bike mechanical failure.
- Red – Red flag means something has occurred and we need to stop the track. Please exit immediately, do not pass others, do not go super slow if you don’t need to. Continue looking up the track for the incident to make sure nobody is on the track. Red is used for a crash.
- Checkered – Session over; exit quickly for the next group.
5. Run-Offs
Run-offs can be frightening, but they don’t have to end in a crash if you follow these guidelines:
- Loosen your grip, look ahead, and get off the throttle so engine braking can slow you down.
- Avoid sudden braking; let engine braking do the work.
- If you enter a gravel trap, keep the bike as vertical as possible and stay relaxed to absorb energy. The bike may dig in—wait for assistance if you can’t move it. If other riders are a risk, abandon the bike and seek safety.
- In the rare event of a stuck throttle, pull in the clutch, hit the kill switch, then gently feather the clutch (and rear brake if needed) to decelerate.
- Never use the front brake on grass or dirt. Once you have control, you may lightly feather the rear brake—never stomp it, or you risk locking the wheel and a high-side.
- Don’t try to steer while still at speed. Regain stability before making any turns.
- When you’ve regained control, re-enter via pit out and have a marshal inspect your bike before returning to full speed.
After a run-off, ride the next laps at 60–70% effort to refocus on your lines and reset your mindset.
Run-off areas are usually clear of obstacles, but if you encounter a hazard, do your best to avoid it. Multiple run-offs may result in you sitting out the session or being asked to leave the track—often fatigue (for example, pulling an all-nighter) is the culprit behind loss of concentration.
6. Fall-Downs
Falling is never the goal, but it can happen. Follow these procedures to keep yourself and others safe.
If you see another rider down:
- Do not stop—proceed off track at the next safe exit.
- Tap your helmet to signal “Rider Down.”
- Exit the track and await the marshal’s instructions; you may be cleared to rejoin.
If you fall down:
- Move out of the impact zone immediately.
- Leave the track for your safety.
- Do not remove your helmet. Removing it will immediately red-flag the session—keep it on until you’re cleared by medical personnel or track officials.
7. Lines and Passing
Passing is rarely practiced at trackdays, but at Superbike Camp we teach proper passing technique. We’ll introduce the basics here, but hands-on training with your mentors is essential—and it all starts with mastering lines.
- Study the course layout thoroughly.
- Note elevation shifts and camber variations.
- Identify line options that optimize contact patch, speed, and grip.
“There is no spoon.”
Do not try to bend the spoon; that is impossible. Instead, realize the truth: there is no spoon. Then you will see it is not the spoon that bends—it is only yourself. – The Matrix (1999)
There is no perfect line! Your ideal path depends on your machine, track conditions, and other riders. Lines help you navigate the course efficiently by maximizing grip and speed during direction changes.
- Blue line: Ideal for lightweight bikes (e.g., 500 cc) that need to carry speed.
- Green line: The optimal path when the track is clear and you’re carrying pace.
- Orange line: An aggressive “brake hard – turn sharply – accelerate hard” racing line.
These examples are exaggerated—each rider and bike combination will choose the line that best suits their needs.
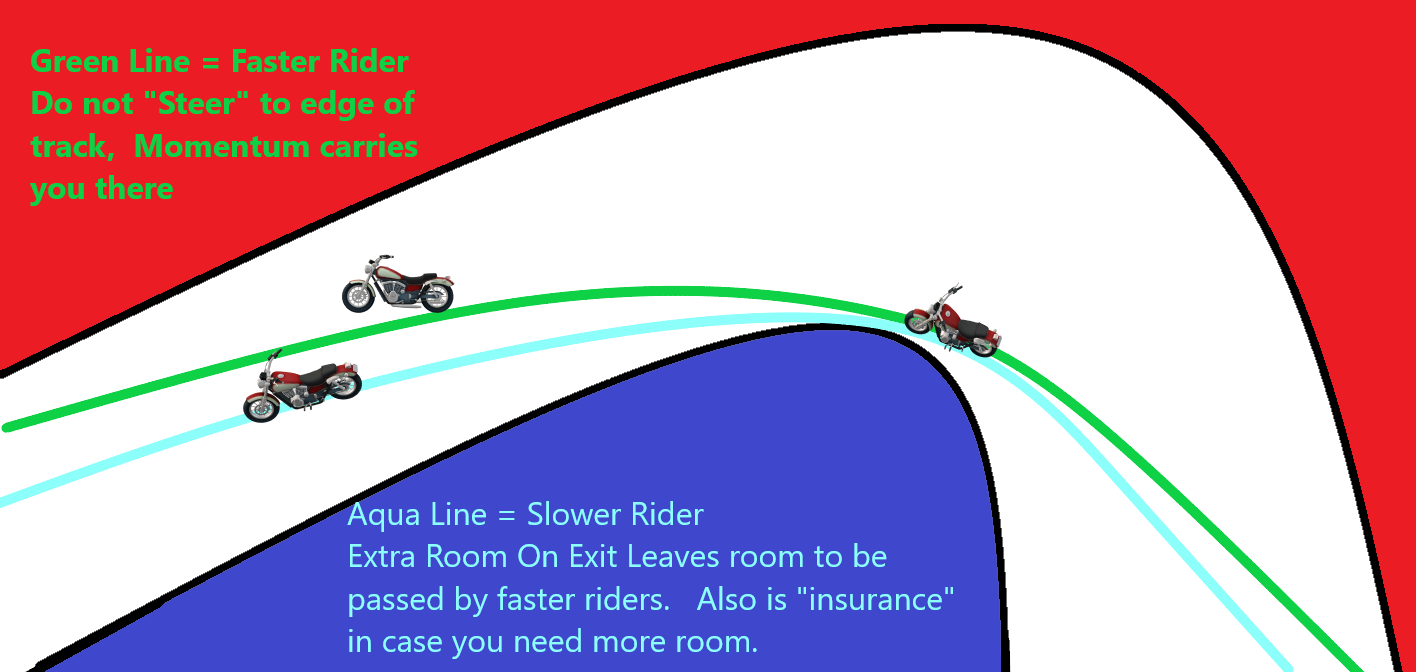
Tight Lines – Two Lanes
Developed by Craig Gleason of Texas Motorcycle Academy at Harris Hill Raceway, this technique gives faster riders a way around slower riders, provides an “insurance lane,” and keeps your eyes up track.
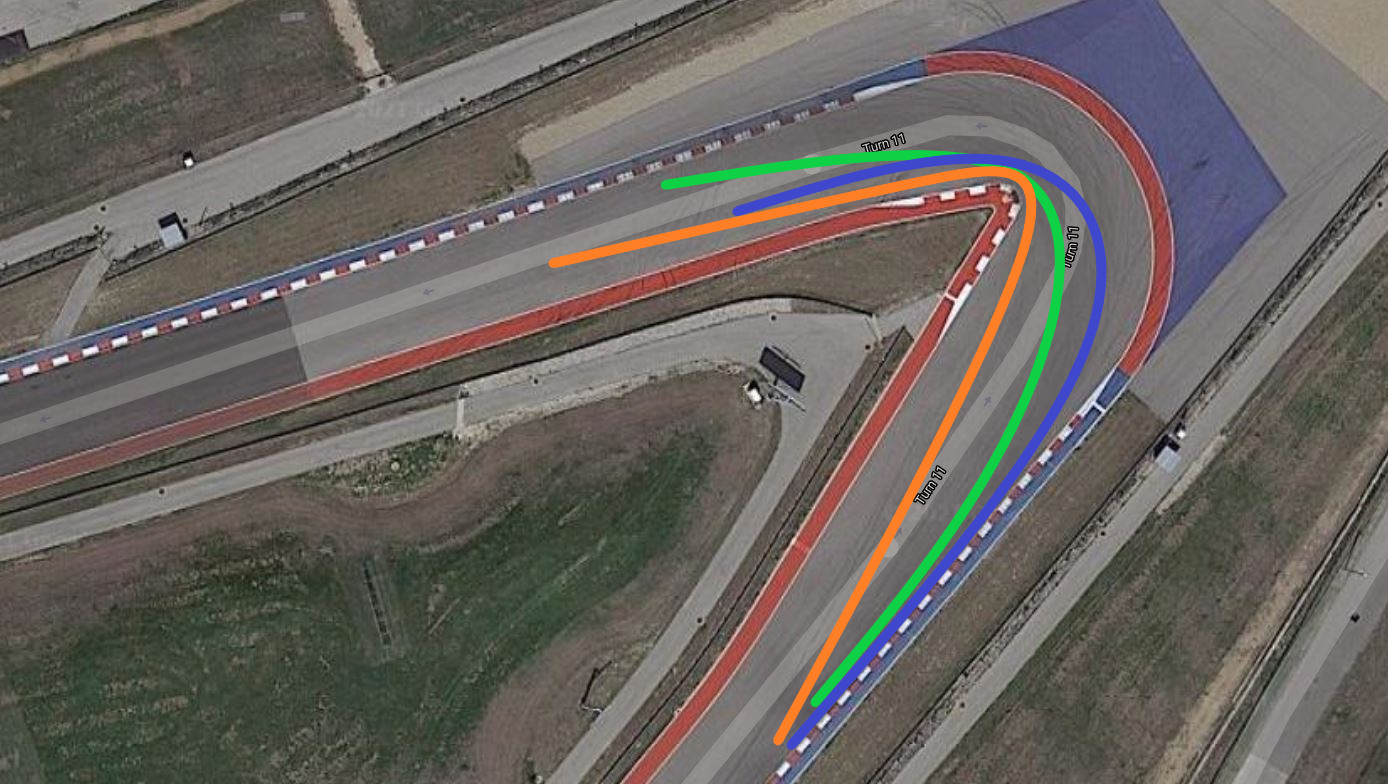
COTA Critical Corners
Turn 11: Leading onto the longest straight, this corner has the third-highest incident rate. Common causes include over-ambitious braking and delayed change of direction, resulting in mid-corner rear slides. Easy fix: Change direction first—point the bike where you want to go before accelerating.
Turn 12: At the end of the main straight, incidents often stem from late-braking duels and run-offs. Easy fix: Identify the apex as your brake marker, look up track as you turn, and avoid inside passes after the last brake marker. Instead, plan a safer pass between Turns 12 and 13.
Turn 20: Just before the finish line, this turn tempts riders to push too late, causing front-end lowsides. Easy fix: Prioritize corner exit—line up early to maximize drive onto the straight and gain time.
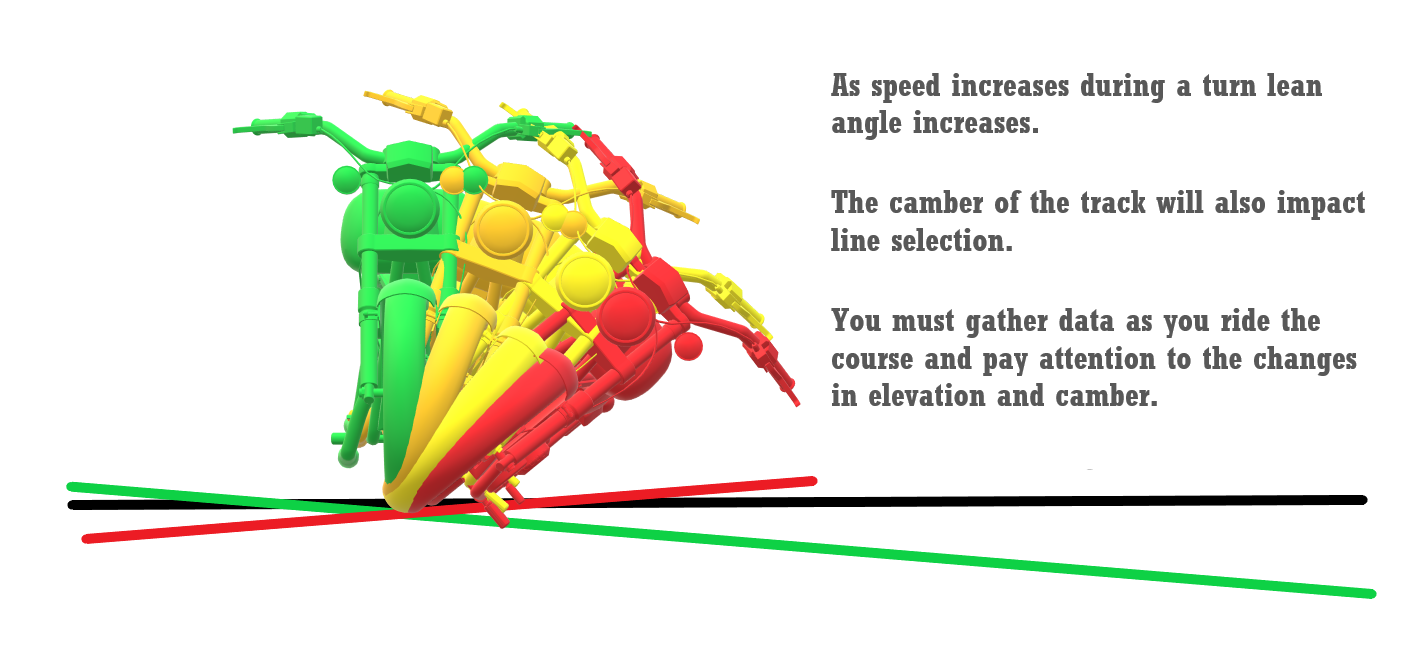
COTA and Camber
COTA’s elevation and camber changes (Turn 20 sits atop an uphill straight, for example) affect lean angles and grip. As speed increases, both lean angle and track camber influence your line choice and traction. You must gather this data as you ride to refine your lines.
The final section covers passing basics—a topic that often challenges intermediate riders. It doesn’t have to be difficult; we break it down into ABCs and 123s.
Passing ABCs and 123s
3:16 Trackdays Superbike Camp provides this guide to passing, which reduces incidents by teaching technique at slower speeds.
Prepare by mastering:
- Course layout
- Elevation and camber changes
- Line selection for optimal grip and speed
When you feel confident with the above, apply the ABCs of passing:
- A – Always (Step 1): Look where you want to go.
- B – Be Confident (Step 2): Ensure the path ahead—at least two bike lengths—is clear.
- C – Clean (Step 3): Execute a smooth pass with at least 6 ft of lateral clearance.
With lines and passing basics in place, you’ll pass safely and efficiently on track.
Thank you for taking the time to read this guide. We’re excited to see you at Circuit of the Americas!